Writing Your Thesis in Word
Follow these instructions and tips for successfully writing your thesis in the Word thesis template. Don't have the thesis template? Download it from our website.
CAUTION: DO NOT USE THE WORD THESIS TEMPLATE IN ANY DOCUMENT OTHER THAN WORD. (OPENOFFICE, NEOOFFICE, PAGES, GOOGLE DOCS, ETC). Make sure that you are using Word on the computer and NOT Word on a browser! Your formatting will break if you do so!!
Some of the instructions will vary depending on the version of Word you use. We have documented the steps for Word on Mac and Word on Windows.
- Styles
- Section Breaks
- Table of Contents, List of Figures, List of Tables
- Pagination
- Figures
- Tables
- Footnotes
- Deleting Optional Sections
- Formatting Thesis to be Double-Sided (with mirror margins)
- Copying and Pasting into Word from Another Document
- Other
Styles
"Styles" are used in Word to easily apply a set of formatting attributes--such as font, font size, indentation, and spacing--consistently throughout a document. When you apply a style to a paragraph, it is formatted with the attributes defined in the style. The Word thesis template has many pre-defined styles for things like chapter titles, sub titles, main body text, quotes, figures, etc. See the table below to learn what styles to use and where.
Pre-defined styles in the Word thesis template
| Type of text | Name of Style | Special Note |
| Normal, paragraph | Body,b | The first line is indented, so you don't have to press the tab key! |
| Front matter page titles (e.g. Acknowledgments, Preface, Abstract) | Heading Front Matter, hfm | Text in this style will look like a heading but will not appear in the Table of Contents. |
| Chapter Titles (e.g., Introduction, Chapter 1, etc.) | Heading 1,h1 | Text in this style will look like a heading and will appear in your Table of Contents. If need be, press shift+return to force text to next line without creating a new paragraph: this is useful for long headings that need to appear as a single line in the TOC. |
| Sub chapter titles |
Heading 2,h2 |
These sub-headings also appear in the TOC. |
| Quote set aside from main body of text | Quote,q |
Spacing is adjusted before and after the paragraph so you don't have to press the Return key. |
| Paragraph immediately following a quote | After Quote,aq | First line is not indented. The paragraph following this this style will automatically revert to Body,b. |
| Image or figure | Figure,fig | Centers the image between the margins. Before you insert the image, select the Figure style in the space immediately before where the figure will be. This will keep it correctly formatted; it'll be fussy if you don't! |
| Title of an image/figure | Figure Title,ft | Text in this style will populate the List of Figures. |
| Figure caption | Figure Caption,fc | If your figure has a description following the title, use this style! It will not appear in the List of Figures. |
| Title of a table | Table Title,tt | Text in this style will populate the List of Tables. |
| Table caption | Table Caption,tc | If your table has a description following the title, use this style! It will not appear in the List of Tables. |
| Bibliography text | Bibliography | The second line is indented. |
Note: Word has many default styles that can't be deleted. To avoid confusion from thesis-specific styles and Word's default ones, look for a comma after the name of thesis styles (e.g., Heading1,h1).
How to apply styles
See specific instructions for your version of Word:
How to modify styles
If you don't like the way a style is defined, you can easily modify it!
- Go to the Format menu and choose Styles.
- Select the style you want to modify from the lefthand side.
- Click the Modify button.
- Change the parameters you want. More options are available from the Format drop-down menu.
- Click OK when you're done.
Tip: Want to change the font type in the entire thesis? Modify the "Normal" style.
How to copy styles from the template to another document
If your document suddenly loses styles from the template, you can readd them without worry!
- Go to the Styles ribbon and select the bottom-right pop-out button for the Styles Pane to appear.
- Select the Manage Styles icon (may appear as an "A" with a checkmark button).
- Click the Import / Export button located on the bottom-left.
- Click Open File (on the right-side) and select the thesis template. Select missing styles.
- Click Copy to copy the styles over to your current document.
Section Breaks
The thesis template is designed for double-sided printing, so you need to insert an Odd Section Break at the end of each chapter. This will ensure the next chapter falls on the right side (or odd page) of the document. Odd section breaks should also occur at the end of each section in the front matter.
How to insert an Odd section break (on Mac)
- Turn on hidden components so you can see when a section break is inserted (On the Home menu, click the ¶ button.)
- Place your cursor at the end of the chapter.
- Go to the Layout menu > Breaks > Odd Page
- When the section break is inserted, you'll see this:

Note: Have you converted the thesis template to single-sided? If so, you need to use Next page breaks instead of Odd.
See specific instructions for your version of Word: 2016 & newer (Mac); 2013 & newer (Win)
How to delete section breaks
Multiple consecutive section breaks will create extra blank pages in your thesis. Delete them this way:
- Use the show/hide button (¶) to reveal hidden components.
- Place your cursor just to the left of the section break.
- Hold down the Shift key and the right arrow key to select it.
- Press the Delete key.
Note: If that doesn't work, go to the View menu > Outline. Click on the section break to highlight it, and delete it.
Tips and Quick Fixes:
- Use only one section break at a time. Multiple consecutive breaks create erroneous blank pages. (Learn how to delete sections breaks above)
- In some cases it may be necessary to force something to the next page (eg, an image). Use a page break for this (Insert menu > Break > Page Break)
- Click the Show/Hide (¶) button to see what section breaks you already have.
- If you insert a section break, and it messes up the previous section break, fix it this way:
- Format menu > Document > Layout tab
- Section start: Odd page
- Check “Different odd and even” and “Different first page”
- Apply to WHOLE document
- See instructions for your version of Word: Word 2016 & newer (Mac); 2013 & newer (Win)
Table of Contents, List of Figures, and List of Tables
The Table of Contents, List of Figures, and List of Tables will automatically populate based on the styles you apply to certain text like chapter titles, figure titles, and table titles. Periodically, you will need to update the Table of Contents and other tables so it will populate this information.
How to Update the Table of Contents, List of Figures, and List of Tables
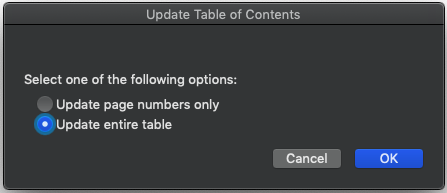
- Right-click (or control+click) on the gray shaded part of the Table of Contents (or List of Figures/Tables).
- Choose Update Field.
- If prompted, select Update entire table.
Tips and Quick Fixes:
- Do NOT edit the Table of Contents manually!
- Check that you applied the right style to the chapter title, figure title, or table title in the body of your thesis.
- Have a long chapter title but need it to appear as a single entry in the TOC? Press shift+return to force text to next line in the chapter title without creating a new paragraph.
How to Add Another Table of Contents
If you want to add a new table of contents, follow these steps, which use a table of schemes as an example.
- Creating new styles of "Figure Title" and "Figure Caption"
- Select "New Style" in the styles pane
- Basing the new style on "Figure Title" or "Figure Caption"
- Rename the new style to something else (for instance, "Scheme Title" and "Scheme Caption")
- Save
- Apply these new styles to your scheme titles and captions
- Inserting the new table
- Follow instructions based on your version of Word:
- Select "No" if you are prompted "Do you want to replace the table of contents?". This prevents your first Table of Contents from being replaced with your table of schemes.
Pagination
There are specific pagination rules you must follow, all of which are outlined in the Senior Handbook. Some important ones to keep in mind:
- Page 1 is the first page of the first chapter of your thesis (usually the Introduction).
- The page number is hidden--not printed--on the first page of each chapter (including Introduction), even though those pages DO count toward the pagination.
- Blank pages should not have a printed page number (but do count toward the pagination).
How to hide a page number on the first page of a chapter
- Make sure the right kind of section break is inserted at the end of the previous chapter (e.g, Odd section for double-sided thesis)
- Make sure the header in this chapter is set to Different First Page:
- Format menu > Document > Layout > Check ‘Different First Page’
- Delete any page number that appears on the first page.
How to fix pagination on your own
- Page Layout View > double-click on the page number. Or from 'Insert', choose 'Page Numbers'.
- If you are in your first chapter, normally your Introduction, click on 'Format..' and under 'Page Numbering' make sure that 'Start at:' is chosen, and manually enter 1. Then, click 'OK' and ensure that 'Show number on first page' is unchecked.
- When you are not in your first chapter, normally after your Introduction, make sure the 'Show number on first page' is unchecked. Then, click on 'Format..' and under 'Page Numbering' make sure that 'Continue from previous section' is chosen.
- When pagination completely breaks, come to the Help Desk!
Figures
Inserting images is more than a simple copy and paste. Follow these guidelines:
- Keep the image saved to your computer (don't copy and paste from a web page).
- If you need to modify the image more than just a simple resize, do it in an application like Photoshop (not Word).
- Follow the exact instructions below for inserting the image into the Word thesis template.
How to insert an image
- Try to keep your images a reasonable size (under 1Mb file size. See the help desk or library for help. Aim for 300dpi, 150 at the least)
- Put the paragraph in the Figure style before inserting the figure
- In Word: Insert menu > Picture > From File
- Put the title of the figure in the "Figure Title" style (which will appear in the TOC)
- If you have a caption, use the "Figure Caption" style.
How to leave space for a large figure
Sometimes you may need to insert a figure that takes up an entire page. To do this without causing any pagination errors, follow these instructions:
- Insert the cursor where you want to add the figure page.
- In the menu bar, go to Insert > Break > Page break.
- Repeat step 2.
- You should now have a blank page. When you print your thesis, remove this page and add the figure page you want.
Tables
There are a number of ways to insert tables into your thesis.
- Consider creating the table within Word. Another option is to build it in Excel.
- From Excel, you may need to it as an image or PDF and then insert it into Word.
- Have a really long table that needs to be oriented in landscape mode? Don't rotate the page! See our guidelines below.
- Though there is not particular style to use for the table itself, use the "Table Title,tt" and "Table Caption,tc" styles.
Footnotes
In order to insert a footnote in your thesis, follow these instructions:
- Insert the cursor where you want to add your footnote reference
- Either, click on the "References" tab, and select "Insert Footnote"
- Or, click on "Insert" in the top menu bar (not the insert tab) and select "Footnote...", select footnote, and click insert again.
- You should now have a reference number where you placed your cursor and a footnote at the end of the page.
Footnote text should be in the "Footnote Text" style. The number within the footnote, as well as the in-paragraph reference number, should be in the "Footnote Reference" style. Footnotes should automatically be in the appropriate styles, but if you encounter any problems with your footnotes, checking the style is a good first step.
If your footnote numbering gets out of order, click on "insert" in the top menu bar, select "Footnote...", select "Convert...", and then "Convert all footnotes to endnotes" and select OK. Don't hit "Insert", instead hit "Convert..." again, and this time select "Convert all endnotes to footnotes" and select OK. Once that is done, select "close".
Deleting Optional Sections
Some of the sections are optional, such Acknowledgments and Preface. The trick is to delete the text and the corresponding section break or you'll end up with multiple blank pages.
- Delete the text you don't need.
- Delete the section break at the end of the chapter (see instructions above).
Double sided printing (with mirror margins)
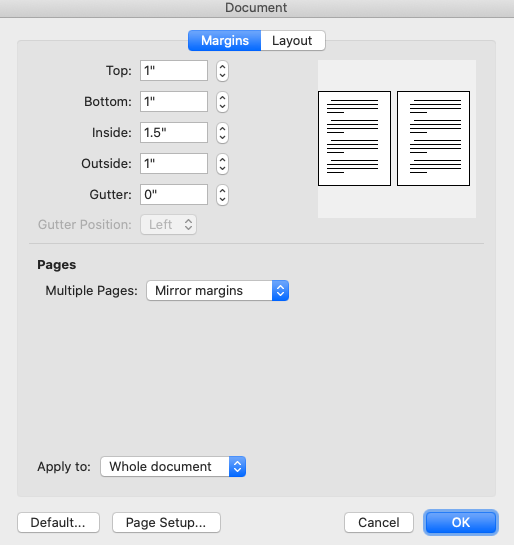
Thesis needs to be formatted with mirror margins, here's how to do it (and see screenshots included).
- Go to the Format menu (on top bar) > Document > Margins tab.
- In the multiple pages drop-down box, select "Mirror Margins".
- Make sure the margins above are 1" except "Inside" should be 1.5".
- At the bottom, "Apply To": Whole Document.
- Go to the "Layout" tab and change a few things:
- "Section start": Odd Page
- Check the boxes for "Different odd and even" and "Different first page" options.
- Again at the bottom, "Apply To": Whole Document.
- Click OK to save the settings when done.

Copying and Pasting from Another Document
When writing a thesis in another sort of document (e.g. Google Docs, LibreOffice, etc), you'll have to eventually transfer this into the Reed-provided templates. However, the formatting on your documents might interfere with the Word template
Here is how to copy and paste from Google Docs:
Additional Considerations
Formatting the thesis to be single-sided (NOTE: This is NOT the same as printing single-sided!!!)
- Uncheck Mirror Margins (Format menu > Document. Margins tab > uncheck 'Mirror magins'. Apply to: WHOLE document)
- Replace all Section Break (Odd Page) to Section Break (Next Page):
- Format menu > Document. Layout tab > Section start: Even Page. Uncheck ‘Different Odd and Even’. Apply to: WHOLE document
- Set page number header alignment: In the first section, like Intro, Insert > Page Number > set alignment
Rotating Pages
Though rotating a page in Word may seem like the right thing to do, DON'T DO IT. Instead, leave these pages in a separate document; then insert them by hand after printing. It's OK to display no page numbers on these pages, but they still must be counted in the pagination. Insert a one blank page (using Insert > Break > Page Break) for each manually inserted page.
Inserting a Really Long Sideways Excel Table into Word
Here are four different methods for inserting a properly formatted, good quality version of a long excel table!
Adobe Illustrator:
- Print the Excel table to PDF (File > Print > Save As PDF) Note: Make sure your table uses a standard font, like Times
- Open the PDF in Adobe Illustrator (installed on the IRC computers)
- Select all and copy (Select > All and Edit > Copy)
- Create a new document in Illustrator (File > New)
- Paste in the copied document and rotate (Edit > Paste and Object > Transform > Rotate)
- File > Save as EPS
- Insert the EPS into Word
Inkscape (free download here!):
- Save the Excel file to your desktop as a PDF. (File > Save As...)
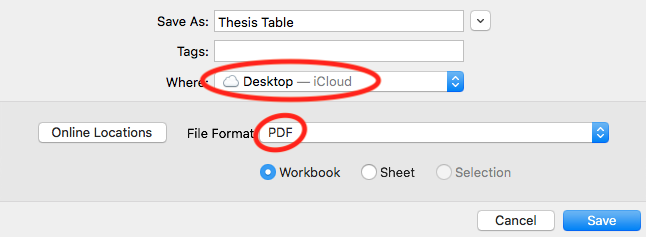
- Open Inkscape, then open the PDF. (File > Open... > Desktop > Thesis_Table.pdf) Select which page you would like to flip sideways and click Ok. Note: You can only do this one page at a time :(
- Save the Inkscape page to your desktop as an SVG. (File > Save As... > Save)

- Open Word and drag the SVG from our desktop onto the page. From there you can crop it, modify size and orientation. When you are satisfied, copy and paste it into your thesis.
Google Drawings:
- Copy and paste the table into Google Drawings (from Word is best); resize in Google Drawings as needed
- Export as an SVG (File >> Download >> Scalable Vector Graphics (.svg))
- Insert as an image into Word, and now you can rotate the table!
Using Word (if the quality doesn't need to be extremely detailed):
- Copy and paste the table into a separate Word doc. Use page setup to make it landscape:
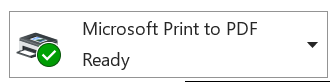
Layout > Orientation > Landscape - Print to PDF
- Open the PDF in Preview (Mac)
- Rotate pages: Tools > Rotate Left (or Right)
- Export each page as a 150 dpi PNG. File > Export > PNG

- Insert into the thesis Word document as pictures: Insert > Picture > From File. Then apply the "Figure, Fig" style to the image.
Whoopsie! Accidentally delete the Table of Contents, List of Tables, or List of Figures?
Here's how to add them back:
Table of Contents
- Insert > Index and Tables
- Select the Table of Contents tab
- Click Options
- Make sure 'Heading 1, h1' has a TOC level of '1'
- Repeat for Heading 2-3, numbering their TOC level respectively.
List of Tables
- Insert > Index and Tables
- Select the Table of Figures tab
- Under the Caption label box, select Table
- Click Options
- Check 'Style' and pick Table Title from the drop-down box
List of Figures
- Insert > Index and Tables
- Select the Table of Figures tab
- Under the Caption label box, select Figure
- Click Options
- Check 'Style' and pick 'Figure Title' from the drop-down box
Printing
- Before printing, update the Table of Contents, List of Figures, and List of Tables
- Print to PDF (on Mac File menu > Print > Save as PDF)
- Open in Preview or Adobe Reader and look at pages side by side
- Preview: View > Two Pages.
- Adobe Reader: View > Page Display. Check "Two-up Continuous" and "Show Cover Page During Two-Up"
How to print a page range
- Save as PDF first, then print the range of pages.
Writing Thesis with Multiple Languages
For seniors writing their theses using multiple languages, the line spacing may be inconsistent, especially if the body is copied and pasted from another document into the template. This can be fixed by selecting the paragraph(s) and clicking "body, b" in the Styles Pane, or by changing the font of the non-Latin characters to the ones listed below. For some languages that use non-Latin characters (e.g. Greek, Russian), simply switching the language on your computer's keyboard input (not Word) between English and the other language will generally preserve the correct line spacing.
Fonts that shouldn't mess up line spacing:
- Chinese: PMingLiu, MingLiu, KaiTi, Kai (simplified only), BiauKai (traditional only)
- Korean: Batang, Batangche