LaTeX Your Thesis
- General Thesis Tips
- About the Thesis Template
- Common Queries
- Using Overleaf
- Bibliographies
- Special Topics In Thesis: Tricks to Make Life Easier
General Thesis Tips
- BACK UP YOUR THESIS. Often you will not realize for days or weeks that important paragraph or page is missing. Make recovery as easy as possible by keeping a dated backup of each writing session. Then copy those backups to at least two locations other than your hard drive: your home server, Gmail account, thumb drive, the options are wide and numerous. There is no excuse for not backing up the most important document of your Reed career.
- Start your bibliographic database the day you start reading. Keep it up to date and annotate it, so you know where it came from (library, Summit, ILL, public library, professor), whether you've read it, and where you want to cite it. This will make the writing process less frustrating and creating the bibliography seamless.
- Think of thesis formatting as a form of productive procrastination. Please don't put it off until the last week.
- BACK UP. No, seriously. It's not "if" your hard drive fails, it's "when." Not to scare you or anything, but it's a good habit, like buckling your seat belt or not leaving your laptop unattended. You really don't want to wish you had taken that small precaution.
- Keep the editable original of each graphic you want to include in your thesis in one folder. Later you may need to change a graphic quickly and having the editable original makes it easy. For graphs, keep the original Excel/JMP/Stata document, not a PDF. For photographs, keep a high resolution copy (such as a tiff). For drawings and illustrations, keep the original Illustrator document.
- Use the timesaving benefits of LaTeX from the first day. Cross references can refer to tables, graphics, and chapters so you do not have to update references as your thesis changes. Use comments to make notes about what needs to added or changed.
- Enjoy the experience! And get some sleep, food and relaxation on occasion. Hundreds of people did this before you; you can do this too.
About the Thesis Template
The thesis template, available for download here, contains two main files of importance: Reedthesis.cls and Thesis.tex. (As you noticed, there are many other files in the folder. For more information about all the files LaTeX creates, see our article on the subject.) Reedthesis.cls is a document class like article or book, and so must be defined in the preamble (see the section about document classes for more info). Additionally, since the average installation (even Reed's) does not include Reedthesis.cls, you will have to bring the file wherever you want to work on your thesis.
The thesis template folder also contains bonus materials you may find helpful, such as an array of bibliography style files (.bst) that can support an undergraduate thesis citation and files already modified to work with a psychology major's specific needs. So make sure that you have the latest version of the thesis template and read through the thesis.tex file for more complete overview of the template's contents.
Common Queries
While the content of your thesis is certainly much more important than the appearance, a nicely typeset thesis will be more pleasant to look upon ten years from now. We have collected nearly every query for the last few years so you can make the changes you want and get back to revising your latest chapter. That typo on the first page will bug you even more than the headers once the thesis is bound and in the library. Most of these answers are links that lead to other pages in our LaTeX documentation because they fit well elsewhere and this page would be much too long if we decided to be redundant.
Changing Headers
If you don't like how your headers appear, you can change them. That is, they are modifiable in LaTeX, but your adviser or the library might not like the change. But people change how they look all the time (usually to have the name of the chapter in small caps and without the title of the current \section), so the advanced LaTeX page has a few ways to go about tweaking the headers.
Using and Modifying Sections
When using Reedthesis.cls, you will use \chapter{ optional title here} to denote the beginning of a new chapter (obviously) while \section{ title} and \subsection{ title} will subdivide those chapters. You do not need to use \subsection if you don't wish to, but \section will probably prove very useful to break up your chapters.
If you don't like the automatic numbering of \chapter, \section and \subsection, you can easily eliminate the numbering by adding an asterix to the command ( \chapter*{ title}, \section*{ title}, etc.), but then the section won't show up in the Table of Contents. To learn how to make sure these show up in the ToC, and to learn more about sectioning commands in general, check out the advanced LaTeX page.
Handling Images and Tables
In order to add an image in LaTeX, you must use the package graphicx and place the image ( \includegraphics{ imagename}) inside the figure environment. Be sure to give a caption if necessary, but remember that LaTeX will add the "Figure x.x" to your caption on the typeset document. For more information on handling images, including the answers to our most common questions, see our graphics documentation. To make your life easier, I highly suggest that you read the section on using references and labels.
Like figures, tables also need to be in a float environment such as tabular or longtable. For an introduction to tables or to learn how to do more complex table formatting, see our documentation on tables. To learn how to change their position, numbering or presentation, the graphics documentation covers the same material. You may have to replace figure with table wherever appropriate, but the commands are basically the same. Feel free to stop by the CUS desk or try Google if you get lost!
Landscape Orientation
When you have a table or figure that is too wide for your page, you will need to rotate your page to be in landscape rather than portrait orientation. To avoid rotating your headers and footers as well, use the package lscape (for more information on packages, see the advanced LaTeX section) and enclose whatever needs to be rotated in the landscape environment:
\begin{landscape}
\begin{figure}[htbp]
\caption{A Really Wide Figure}
\includegraphics{panoramicimage}
\label{pan}
\end{figure}
\end{landscape}
This will keep the headers and page numbers in the portrait orientation, but rotate your figure or table as well as the appropriate caption. You do not want to use the package Portland; this rotates the headers and footers as well, and the registrar will probably not accept such a setup.
Managing Paragraph Spacing
The line breaking and spacing algorithms of LaTeX are not always successful. Sometimes the space between paragraphs is inconsistent from page to page, or even within the same page. If this happens to you, try ignoring it for a bit and continue to write your paper. Often the addition of a new subsection or just more words will be reorganized into a more pleasing arrangement.
But don't add unnecessary bulk to your thesis just to make it look good. Try putting this in the preamble: \setlength{\parskip}{0pt}. This sets the inter-paragraph spacing to 0 pts. You could also tell LaTeX that it can be more permissive when placing page breaks by putting \allowdisplaybreaks or \raggedbottom in the preamble. If none of these solutions work and you don't want to add more content to your finished chapter, bring your .tex file to the CUS desk and we shall see what we can do.
Using Overleaf
Overleaf is an online LaTeX editor that allows one to use LaTeX software without downloading or configuring. It has a variety of templates, but can also be used to make changes on our thesis template.
Uploading the thesis template to Overleaf
- Download the LaTeX template .zip file from the Thesis Templates section at downloads.reed.edu
- Go to overleaf.com and create an account. We recommend using personal credentials so you don’t lose any data after graduation. Note: If you have a subscription through Reed you’ll have to use your Reed credentials instead
- Once in Overleaf, click on “New Project” and select Upload Project
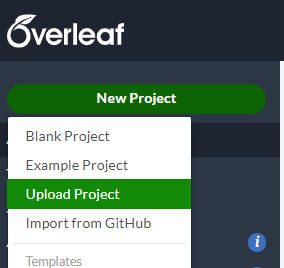
- Select template .zip file from your computer and click Upload if prompted.
- Using the template is the same as with any LaTeX compiler
- Thesis edits should be made to thesis.tex, and a live version can be viewed by clicking Recompile. You can also upload your own .bib file to your project instead of using the example prelim.bib.
Add a collaborator
You can add your adviser as a collaborator so they may leave comments on your work as you go. Without a subscription you can have a single collaborator, with a student subscription you can have up to 6. If you are interested in joining our pilot subscription program, inquire by emailing cus@reed.edu.
- Open your project.
- In the top-right corner, select Share

- Enter the email of your adviser and change their permission to Read Only.
They should now be able to look at and comment on your paper.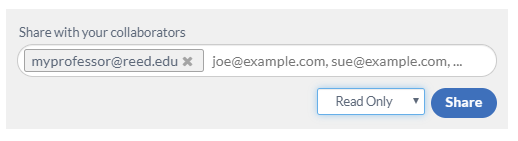
Bibliographies
You will read way too much for your thesis; as a result, your bibliography will be ridiculously long. Thankfully, there is this great program called BibTeX that will typeset your bibliography for you. For more general information on using BibTeX to create your bibliography, as well as choosing a bibliography format and using a bibliography manager, see our BibTeX documentation.
Managing Your Bibliography
While it is possible to create a bibliography manually, and there are reasons to do so, your senior year will be made a bit easier if you take advantage of BibTeX's automation. We strongly suggest that you use Zotero.
The BibTeX page has the following advice for creating your bibliography in BibTeX, but I thought it was worth repeating here:
- Like with thesis formatting, the sooner you start compiling your bibliography for something as large as thesis, the better. Typing in source after source is mind-numbing enough; do you really want to do it for hours on end in late April? Think of it as procrastination.
- When you have more than one author or editor, you need to separate each author's name by the word and.
- The cite key (a citation's label) needs to be unique from the other entries.
- Bibliographies made using BibTeX (whether manually or using a manager) accept LaTeX markup, so you can italicize and add symbols as necessary.
- To force capitalization in an article title or where all lowercase is generally used, bracket the capital letter in curly braces.
- You can add a Reed Thesis citation option. In fact, your bibliography style (.bst) may already have the option. See the thesis template for more details.
Choosing a Bibliography Style
If you know what bibliography style you need to be using (Chicago or MLA, for example), then you should check out the available bibliography styles on the page about BibTeX styles. If your discipline varies with regard to preferred bibliography style, ask your adviser which format or journal you should use, then check out the BibTeX style page for a Reed edition, or CTAN.org for most other styles.
How to Cite a Reed Thesis
A normal bibliography style (.bst) has formats for a PhD thesis and a Master's thesis, but no preset format for an undergraduate thesis. In your .bib file, use the Phd. thesis entry type, and in the optional type field, enter "Reed thesis" or "Undergraduate thesis" and that will be displayed instead of "Phd.thesis".
Changing the Title of Your Bibliography
The default bibliography title is just "Bibliography," but if you want to change this, LaTeX gives you an easy way to do so. Here is an example of a bibliography renamed to "Works Cited." Note the placement after the command \backmatter and before the commands that make the bibliography ( \bibliographystyle and \bibliography).
\backmatter
\renewcommand{\bibname}{ Works Cited}
\bibliographystyle{plain}
\bibliography{thesis}
Special Topics In Thesis: Tricks to Make Life Easier
Thesis may be scary, but putting it together doesn't have to be. A number of recent alumni answered a call for recommendations to the next crop of seniors; here are the computer related gems.
Fragment Your Thesis with \include
Your thesis is big, or at least it will be soon enough. Instead of typing everything into the thesis template, you can have separate files for each chapter and then include them in the thesis template. To learn more about using the commands \include and \input, see the appropriate section in the advanced LaTeX documentation.
Using Labels and References
If you've made a table or figure, you have probably noticed the command \label{default}. If you want to refer to that table or figure elsewhere in your document, you need only to write \ref{default} and your typeset document will replace that ref with the number of the item. But you can refer to more than just tables and figures with ease:
- Insert the command \label{ marker} anywhere in the text to where you want to refer. Each marker must be unique.
- For figures and tables, the label command should be inserted right after the \caption.
- For equations or lists, the label command should be within the environment as a whole.
- For chapters or sections, it will refer to the first preceding section title, whether it is a subsection, section, or chapter.
- If you want the page number of the reference, use the \pageref{ marker} command. If you want just the reference, use the \ref{ marker} command. For correct spacing, you may wish to precede the reference commands with a tilde (~) if you are using the reference in a sentence or text.
- You will need to typeset your document at least twice to see cross-references reflect any changes. You will know that you need to typeset again if you see question marks where there should be references.
|
LaTeX Command
|
Resulting Text
|
| In Table~\ref{marker1}, the use of fertilizers... | In Table 6.3, the use of fertilizers... |
| See Section~\ref{marker2} for an explanation of... | See Section 1.2 for an explanation of... |
| As seen in Theorem~\ref{marker3}, we have proved... | As seen in Theorem 3.4, we have proved... |
| As seen in page~\pageref{marker3}, we have proved... | As seen on page 12, we have proved... |
Adding Appendices
To add an appendix to your thesis, find \appendix towards the end of your thesis template. Right after the \appendix, it should have another \chapter command, in which you can specify the name of your appendix. This is what the template has:
\appendix
\chapter{The First Appendix}
\chapter{The Second Appendix, For Fun}
You can either write directly in the template as if the appendix is just another chapter, or stick an external document in using \input (for .tex documents only, see the documentation on this) or \includegraphics (for PDFs and other formats, see below). Your appendices will appear in the Table of Contents as Appendix A: Appendix Name (the second appendix will be Appendix B, and so on). The appendix itself will have both Appendix A and the appendix title on separate lines.
If you want to remove the "appendix" part of your appendix title or otherwise modify how that part of the title is displayed, remove \appendix from your thesis, thus making your appendices into normal chapters. You then need to keep the appendix from being numbered as "Chapter #", so make the following modifications to your document:
Original:
\appendix
\chapter{The First Appendix}
To make the appendix named Appendix: The First Appendix, change the above to:
\chapter*{Appendix: The First Appendix}
\addcontentsline{toc}{chapter}{Appendix: The First Appendix}
\chaptermark{Appendix}
\markboth{Appendix}{Appendix}
The \chapter* creates an unnumbered chapter and \addcontentsline adds the chapter to the Table of Contents with the title you specify. The commands \chaptermark and \markboth handle the headers. For more on modifying chapter names, look at the documentation on sectioning. To learn more about changing headers, read the Headers In a Thesis section.
Including Full Page PDFs
Music Majors: There are two LaTeX related routes to typesetting music, MusicTeX and LilyPond. However, past music seniors have struggled to incorporate the files from both programs into their theses. The official CUS recommendation is to use Finale to typeset your music, then export the sheet music to PDF. (See this page to learn how to create pdfs in a program such as Finale.) Using \includepdf (with the package PDFPages) is a great way to add them. PDFPages is a powerful and flexible way to include multi-page PDF files in your LaTeX document. Example: \includepdf[pages=1-8 offset=15 -15,scale=.80, frame=true,pagecommand={\thispagestyle{plain}}]{Orlando.pdf}
Additional Resources
For a quick LaTeX Cheat Sheet, please visit https://www.stdout.org/~winston/latex/.